Making a Technical Decision

Every technology-focused business needs the right technical and architectural experience to make technical decisions effectively, balancing the trade-offs. 

Decision-making is the cognitive process of selecting a course of action among several possible alternative options. Technical decision-making is less about the tool to pick and more about the problem to solve. Once the problem space is well defined, then evaluating the possible solutions becomes a lot easier. Technical decision-making cannot be outsourced.

Engineering organizations of all sizes make technical decisions every day. Every person in a technical role makes decisions, though the scope may vary across roles. Most of the time, these decisions are on a relatively small scale: an individual engineer or a small team solving a problem in the way that makes the most sense to them.

There is proportionality to each decision. Some decisions have a much broader impact, and it’s essential to have a process for capturing those decisions. Such decisions contribute to a deeper vision of how your stack or toolchain is evolving in response to changing technology and business landscape.

Scope the problem

First, what are you deciding (and why)? Determining the actual decision and scope is the first step toward having a rational plan to execute once the decision is made. Think about how you can frame the decision as a concrete question. 

Failing to do this results in people discussing from different premises, causing misalignment about what the decision or project actually entails. When exploring the problem area, consider the following:

  • Specificity – an actionable problem statement takes aim at a particular issue. Avoid boiling the ocean.
  • Decision-maker criteria – defines what information is needed by the decision-maker(s) to select a path forward.
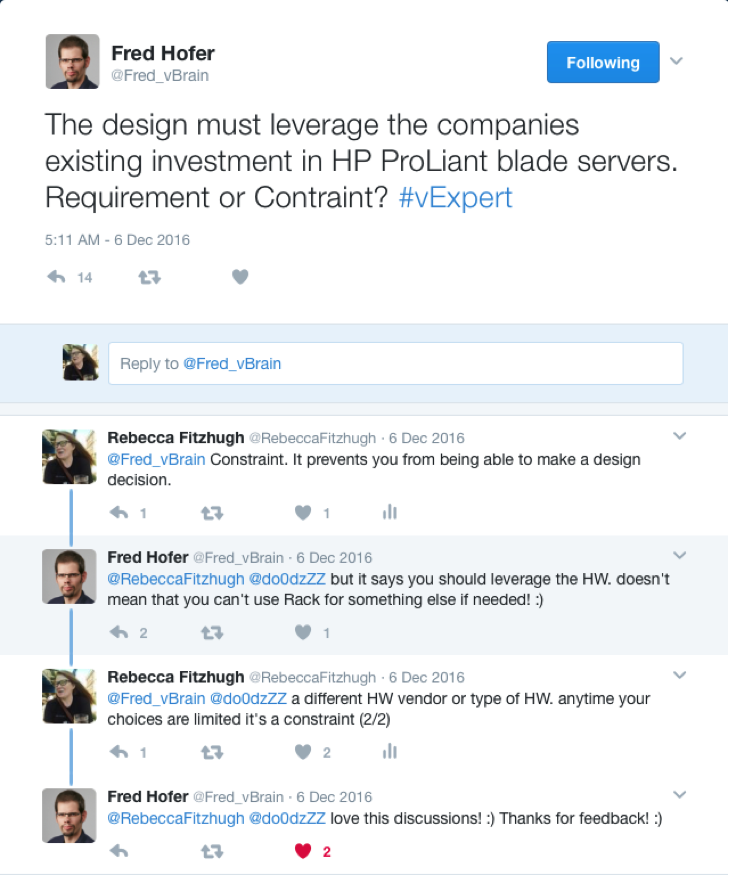
  • Contextual constraints – this is the landscape the decision is made in; for example, capabilities of existing infrastructure, the business landscape, and laws of physics.
  • Timeframe and level of accuracy required – for example, a go/no-go decision must be made by the end of the quarter, or the projected cost savings must be accurate +/- 20%.
  • Plan of action – clearly understands what outcomes are achievable once this problem is solved and communicates the immediate next step.

A problem that is well understood is already half-solved and generally leads to better solutions. Avoid defining any solution at this stage. 

“If I had an hour to solve a problem, I’d spend 55 minutes thinking about the problem and 5 minutes thinking about solutions.” ― Albert Einstein

Avoid scope creep

The impact of scope creep is almost always negative because the work increases, but the timeframe does not. Scope creep is notorious for taking focus away from the actual problem and blowing out timelines. Increasing the problem’s scope will only result in choosing an over-engineered solution or solving challenges you don’t currently have. 

There are commonly three adjustable levers: scope (i.e., what is included as part of a problem to be solved, or what factors to consider in a decision), resourcing (i.e., availability and quantity of personnel that can work as a team on the problem), and timing (i.e., when the work needs to be delivered, or by when the decision must be made). Often, the scope is increased without adjusting the other two levers – inevitably causing problems. 

Ensuring that scope additions are relevant to the problem being addressed is crucial. If the scope increases, then reevaluate the resourcing and timing for the decision or project. 

Prioritization

Prioritizing which problem to solve is a particularly challenging part of decision-making. There’s usually a laundry list of problems to solve or things to do at any given time. The Eisenhower Matrix is an effective way to help organize tasks by urgency and importance. 

In more detail, the quadrants are:

  • Do it now – a task or decision that requires immediate attention. When something is urgent, it must be done now, and there are clear consequences if the decision is not made within a specific timeline. 
  • Schedule it – may not require immediate attention, but these tasks or decisions help achieve long-term goals. Just because these tasks are less urgent doesn’t mean they don’t matter – instead, they need to be thoughtfully planned to ensure resources are efficiently used. 
  • Delegate it – tasks or decisions that are urgent but not important. These tasks must be completed sooner but don’t affect long-term goals. Because there is no personal attachment to these tasks or decisions and they don’t require a specific skill set, these can be delegated to other team members. 
  • Don’t do it – these are unimportant, non-urgent distractions that get in the way of accomplishing goals. 

Be wary of the “tip of the iceberg” approach. It’s easy to solve the most visible problem, but often the real issue lurks beneath the surface. Identifying the real problems requires having a deep understanding of the system (and other systems it interacts with). However, there may be limits to what one can know or what data one can collect. 

Data-driven decision-making works best when buttressed with good intuition and instincts, particularly when making decisions while missing bits of critical data. I learned the 75% method while in the Marine Corps, which prescribes collecting information until you have about 75% of the data needed. Then use your expertise, experience, and gut to fill out the other 25%. 

Weigh the factors

Making the right decisions, especially ones that have a broad impact, can be challenging. It’s never as simple as writing down a list of pros and cons. Numerous aspects and their varying importance have to be considered. This evaluation begins by defining the decision criterion. 

Decision criteria are principles, factors, or requirements used to make a decision. This criterion can be as rigid as detailed specifications and criteria scoring; or as flexible as a rule of thumb. Some examples include monetary cost, opportunity cost, ROI, risk, strategic fit, and sustainability. 

Some decision criteria are discrete; others are continuous. It’s possible to devise a scorecard-like approach or weighted matrix against which to measure each option. Remember that some criteria may be more subjective, so this is an imperfect science. However, a clear view of the criteria can demonstrate how a range of decision options compare.

Manage risk

Effective decision-making is about using the best judgment. Best judgment means having an opinion, going out on a limb, leveraging experience, and taking risks. Part of the decision-making process is managing those risks and minimizing the risk factors. 

Intuitively, when considering risk, we focus on the probability of adverse events while neglecting their impact. Risk, however, is the possibility of something terrible happening, compounded by its consequences.

The NASA Risk Management Handbook defines risk as the following elements: 

  • Scenario – a sequence of credible events that specify the evolution of a system from a given state to an undesired condition. 
  • Likelihood – the measure of how possible the scenario is to occur; it can be qualitative or quantitative. 
  • Consequences – the impact should any of the scenarios occur; the severity can be qualitative (e.g., reputational damage) or quantitative (e.g., money lost). 

Consider the reversibility of the decision. One-way door decisions are decisions that you cannot easily reverse. These decisions need to be made carefully. Two-way door decisions can be reversed. You can walk through the door, see if you like it, and if not, go back. These decisions can be made fast or even automated.

When making a critical, one-way door decision, try to reduce risk by transforming it into a two-way door decision or reducing exposure. Keep in mind that this changes the risk profile but does not change the importance or urgency of the decision. 

Declare dependencies

Decisions don’t live in isolation. Decisions are constrained by and depend on the context in which they are being made. Managing dependencies is an integral part of decision-making and executing the decision once made. Unknown dependencies introduce more risk to a decision. 

There are several types of dependencies to be aware of:

  • Technical dependency – the relationship between two decisions that affect the technical outcome of a decision.
  • Schedule dependency – the relationship between two decisions where the timing of one impacts the other.
  • Resource dependency – a shared critical resource between two decisions. 
  • Information dependency – a relationship where information shared between decisions would impact the scope or consequence of a decision. 

The directional relationship of these dependencies may be upstream or downstream. 

Upstream dependencies are things that a decision is reliant on happening before the decision can be made. These things need to happen upstream and flow down into the decision. 

If upstream dependencies have to happen before a decision can be made, downstream dependencies occur afterward. Any delay in making the decision will impact the downstream dependency. 

Make the decision

There is the possibility of making a bad decision. Because decisions can only be evaluated after the fact, it can be costly to revert a decision because it’s often already embedded into systems and processes. So what does a good decision look like? 

  • It’s a decision. Deciding not to decide is still a decision. But not deciding is a non-decision. 
  • The problem and desired outcome are clearly stated.
  • Context is considered. This may include the business or economic environment, team constraints, and other factors. 
  • The decision is informed by feedback from people with different perspectives.
  • Trade-offs are weighed, as well as how to manage them.
  • It considers what could go wrong, and risks are documented.
  • Assumptions are stated as well as a way to validate them.

There is no perfect decision without trade-offs, and it’s possible to go back and forth about a decision forever. Make the final call and provide clarity to anyone affected by the decision. At this point, the decision maker should be clear about what is being done and the next steps. Teams must be aligned on why this direction is important, the desired outcome, and how this aligns with our strategy and vision. 

Foster discussion and gather feedback

Decisions do not occur in a vacuum. The decision driver should meet consistently with stakeholders and foster discussion. This is where people can ask questions, gain a shared understanding, and reach buy-in. There may be multiple rounds of discussions during the decision-making process. It may begin with a conversation about the problem area, and more specific meetings occur later on particular topics. 

It’s easy to say, “I’m open to feedback,” but creating space for feedback is vital. It can be helpful to frame the question to gather specific feedback (e.g., “is there any context missing?”). Making space for feedback can include:

  • Space out the different constructs of the decision (e.g., just the scope of the problem for one conversation, then discuss trade-offs the next) to give stakeholders time to digest, ask questions, form opinions, and comment. 
  • Facilitate discussion to hear from a broad range of opinions, including those who dissent and others who are less inclined to share. 
  • Make people comfortable to share feedback with the group, but also work behind the scenes to collect feedback 1:1 that they may not want to share publicly. 

Feedback is often captured in the form of trade-offs (i.e., what we give up to invest in a particular option). This demonstrates that the feedback was heard and weighed, but other factors are being prioritized.

There is the possibility of making a bad decision. It is costly to revert a decision already embedded into systems and processes. Thus, gathering feedback early and often helps identify issues or overlaps sooner and allows you to gain acceptance of your technical decision. 

Document the decision

By now, the data has been collected, a clear problem is being solved, and the hypothesis on the correct direction and a way to measure the outcome have been defined. Feedback has been heard and incorporated into the decision. Now the decision must be documented. Similar to feedback, this is something that should be happening throughout the process. 

The purpose of documenting a decision is to capture all the contextual information in one place. The act of writing solidifies the decision, solicits broader feedback, and allows for widespread communication. Documenting the decision also helps in other ways, such as: 

  • Alignment – teams need to understand the historical landscape and context of the decision; a decision’s impact may outlast the decision maker’s tenure. 
  • Reduce duplicate effort – avoid wasting time and effort by repeating past discussions. 
  • Retrospective – context may change; understand why the decision was made at that time and why it was the right/wrong decision. 

It is helpful to have a decision-making model, such as DACIRACI, or ADR. No matter which you choose, it should clearly capture the decision, trade-offs, and the roles and responsibilities of those involved. 

Communicate the decision

Once the decision is made, socialize it with the stakeholders. A common anti-pattern is reaching a decision and not sharing this; eventually, it causes distrust and disharmony in those affected by the decision. Instead, bring them on the journey and make them feel part of the decision-making process. 

Ultimately, create a document of the decision to ensure future members understand its rationale. Share widely in the correct communication channels and then focus on aligning people with the next steps and why a decision has been made.

Useful Frameworks

This section provides a few different frameworks that can be adapted for driving important decisions. Frameworks are like shoes; some will fit more comfortably than others. If a framework doesn’t feel natural to you, then either find one that does or adapt the framework into terms that work for you. 

SPADE

Created by Gokul Rajaram while working at Google, the SPADE framework is intended to help build the decision-making muscle to enable faster decision-making. The framework is a quick assessment of the problem and the decision being made and then used to bring others up to speed. The elements are:

  • Setting – contextualizes the decision by defining the “what” and parsing the objective to explain the “why.” 
  • People – defines the roles and responsibilities of those involved in the decision-making process. 
  • Alternatives – outline the realistic options available, the impact of each choice, and its evaluation against the decision’s setting.
  • Decide – weigh the information, consider people’s feedback, and then make the decision; choose an alternative and detail why it was chosen. 
  • Explain – articulate why the alternative was selected, the impact of the decision, and any associated risks; communicate with stakeholders. 

The decision-making framework outlines a step-by-step process to synchronize and speed up collaborative decisions. 
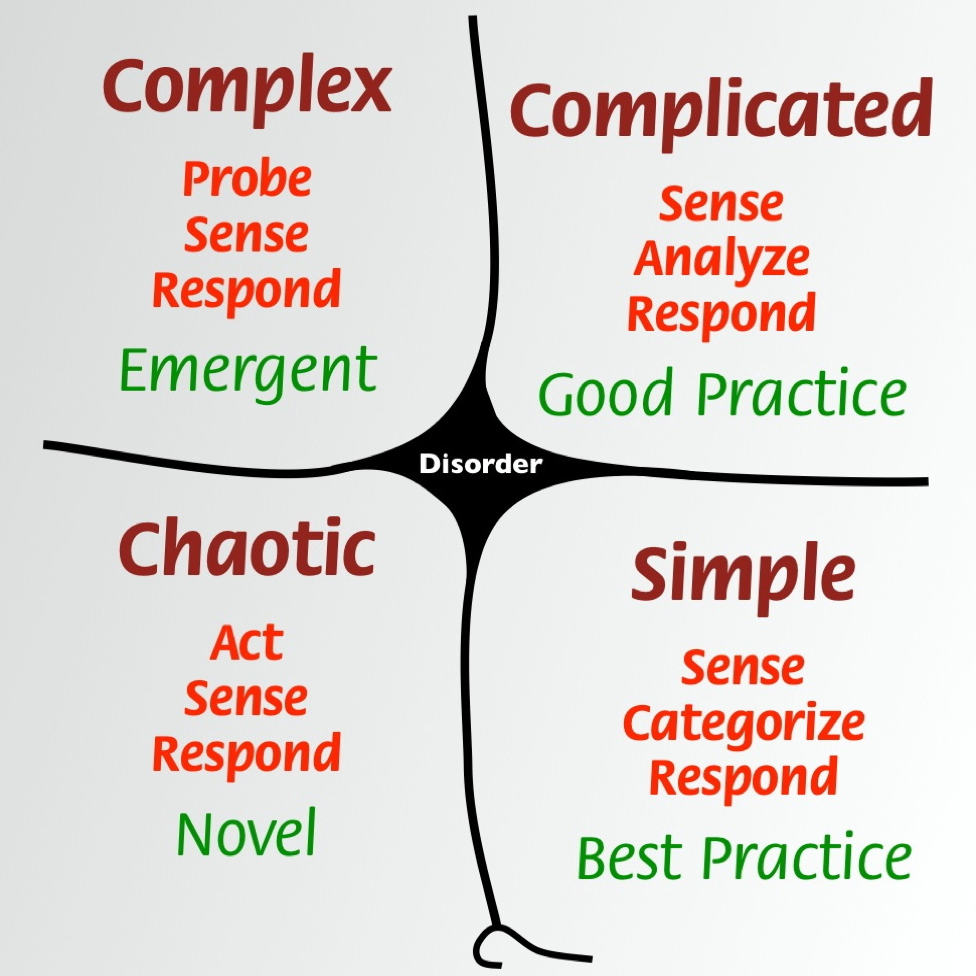
Cynefin 

The Cynefin Framework gives context to decision-making by providing context and guiding a response. It is a sensemaking framework to help think through the details of a situation, classify it, and understand the appropriate response to the situation. The five domains of the Cynefin Framework are:

  • Obvious – the relationship between cause and effect is already well-known; respond according to established practices. 
  • Complicated – the relationship between cause and effect is knowable; the situation can be analyzed to form a hypothesis of what should be done.
  • Complex – the relationship between cause and effect is unknowable; experiments or spikes should be conducted to understand the situation. 
  • Chaotic – the situation is very unstable; one must act quickly, and there is no time to conduct experiments or analyze the situation. 
  • Disorder – not determined; anything whose domain has not been identified falls into this domain. 

These domains help decision-makers create an awareness of what is really complex and what is not. From there, the decision maker can respond accordingly so that no energy is wasted in overthinking the problem and to ensure that they aren’t trying to make the complex fit into standard solutions or vice versa.

OODA

The Boyd Cycle, also known as “the OODA Loop,” is a concept used to describe a recurring decision-making cycle. The goal is to process the cycle quickly and continuously, allowing the decision-maker to react quickly to the changing environment. The four elements are: 

  • Observe – continued awareness of the situation, context, and any changes. The first step is to identify the problem and gain an overall understanding of the environment. 
  • Orient – reflect upon what was observed, and consider what should be done next. This step recognizes, diagnoses, and analyzes the observed situation. 
  • Decide – suggest a course of action, considering the trade-offs and acceptable degree of risk. 
  • Act – turn the decision into action, and measure the outcome. 

Once a decision is made, the situation changes. Thus, the OODA Loop turns on itself and repeats again and again.

Conclusion

Balancing the past, present, and future is challenging when making a technical decision. This process requires patience, understanding, and problem-solving. Technical leaders are stewards of this process and should focus on the outcomes of a decision (rather than implementation or execution details) and aligning teams around why a decision was made. 

Technical decision-making is complex; even the best decisions sometimes don’t turn out as you’d hoped. You can improve your decision-making skills by revisiting old decisions. Was there a missed context? Trade-offs that turned out to be different than expected? A good decision-making process can help confidently deliver technical decisions consistent with long-term strategy and architectural principles.

Setting the Technical Direction for a Team

The larger the organization or project, the more complex and involved the work. A small team of three might be able frequently enough to coordinate, but a group of 12, a stream of 100, or an organization of 1000 can scarcely achieve that. Instead, technical leaders define what to accomplish and how to achieve those goals and document it in a way everyone can easily use as a reference.

Two indicators of a productive and satisfied engineering team are when every team member understands the team’s technical direction and how the work they’re currently doing contributes to that direction. As senior technical leaders, it is part of our role to establish that direction and a plan for how to get there. 

A few words need to be defined to discuss these concepts in detail. Vision, strategy, goals, and mission are often used in overlapping ways. Here’s how the terms will be used:

  • Vision – a long-term view with high-level goals. It briefly describes the current state and projects the future state; it can be aspirational (i.e., what to accomplish).
  • Strategy – how teams, systems, and processes work individually and collectively to implement and achieve the vision (i.e., how to achieve it). 

These concepts take written form but should not be set in stone. It should not require continuous rewrites but a strategy must be adaptable to changes. A six-to-nine-month timescale is ideal for it to stay relevant. It should be reviewed and updated with key learnings discovered along the way.

Set the Vision

A core responsibility of the architect (or team lead) is to ensure a shared understanding of the team’s direction. A clear technical vision is essential to ensure that the entire team pulls in the same direction. It serves as the team’s “North Star” to motivate and guide the group as it grows. The vision zooms out to give perspective on why the team or organization exists. Rather than articulating the specifics of team operations, the vision describes how the team or organization seeks to impact and improve the world around it.

Think of the technical vision as a tool to analyze, align, and execute long-term technical goals in teams or organizations. Technical goals are aligned with stakeholders and then communicated across the organization. It’s a perpetual cycle: goals are brought into execution plans, the outcome is measured and evaluated, and then learnings are collected and used to improve current and future technical visions. 

Technical visions can change over time. This reflects changing business requirements, best practices, and the technology landscape. Changes may also reflect expressing the intention behind the vision more effectively. While technical visions need not be detailed or specific, the intent must be unambiguous. It is the architects’ responsibility to communicate the idea effectively.

Analysis and alignment

Each technical vision cycle begins with evaluating the current reality. Take time to understand the historical context behind the decisions that created this reality. These decisions were made based on the facts at that time; there’s a lot to learn from this. To position ourselves for the future, we should analyze past decisions and how those served the stakeholders and requirements. Once the future direction is decided, work to identify the current and future state gaps.

The technical vision should have the backing of stakeholders and the team (managers and engineers). Not everyone can be involved as the team scales – use discretion to determine who to include in this process. Key players should contribute; this will aid in the buy-in process because they have a personal investment in the undertaking and, therefore, a vested interest in its success. Invest in the art of persuasion. 

Gain credibility by involving stakeholders in the process (i.e., bring them on the journey with you) and incorporate their ideas into the vision (and, later, strategy). Don’t forget that non-business stakeholders (e.g., documentation writers) have valuable thoughts too. A wise architect may note all feedback but prioritize stakeholder requests that echo their thoughts while balancing the business context. Everyone should be aligned on how delivering on goals achieves the desired outcomes. 

Characteristics of a vision statement

There is no one-size-fits-all for crafting a technical vision – each is unique to the team or organization and the current business context. Despite no specific template, there are a few common characteristics of well-written visions:

  • Keep it brief – a vision statement should be easy to read and follow; cut out the fluff and keep just the essentials.
  • Keep it simple – stakeholders and teams should understand the vision. Avoid “industry-speak” where possible; plain language is always more powerful than jargon or buzzwords. 
  • Avoid ambiguity – focus on a clear objective; a vision does not need to be concrete in the manner that a mission does but should avoid possible misinterpretations. 
  • Be future-looking – think long-term (i.e., 3-5 years); a vision statement is set in the future when its objectives have been met. 
  • Be challenging – describe the most ambitious and aspirational objective to convey a sense of passion for the ideal future; it should be challenging enough to motivate the team to work towards achieving the goal. 
  • Be feasible – others have to buy into the vision for its goals to be achieved; the vision should resonate with the team or organization and inspire them to move forward. The goal shouldn’t be so far out of reach that it feels impossible. 

Remember that a picture is worth a thousand words. A visual image can add a lot of clarity to vision and strategy documents around key pillars/components and their relationship to one another.

Define a Strategy

If a vision tells you where you want to go, then a strategy is the path. The starting point for a good strategy is knowing where you are today. But it is also essential to understand how you got there; learning the culture and context will help shape the way forward. A strategy is an approach to a problem that recommends a specific course of action that address the problem’s constraints. The strategy’s what, how, and why must align with the technical vision. Writing a strategy leads the driver through a systematic analysis that can help work through challenges.

To do that, you need to define the current state, capabilities, an understanding of strengths and weaknesses, and what external factors could positively or negatively affect the strategy. Any consideration of a technical solution should be followed by a consideration of the people who can implement the solution (not just in terms of the amount of effort, but also what is needed in terms of roles, responsibilities, and skill sets). In addition to technical solutions, consider whether the necessary processes are in place.

Values and principles

Engineering values and architectural principles are the cultural cornerstones of an organization’s strategy. They are the foundation that feeds into and guides the process to ensure it’s shaped in a way that reflects the overall mission. Together, engineering values and architectural principles articulate the desired approach but allow teams to maintain autonomy in a coordinated and aligned manner. 

Engineering values cover the engineering organization’s culture, including what is valued and how to work together. Values are common beliefs defined that act as guardrails to align the value systems across teams. An example of this is “Move Quickly and Iterate.”

Architectural principles lay out a shared technical philosophy to guide decision-making. Principles are intended to empower engineers to make decisions and provide strong guidance for making those decisions in a way that is coherent with the overall strategy. The principles offer dimensions to weigh options when making a technical decision.

Forge the path forward

People are usually comfortable with difficult decisions in the abstract but may struggle to translate them into specific actions or implementation steps. A good strategy avoids choosing particular technologies. Instead, it focuses on defining components and key concepts and identifying functional and non-functional requirements. A strategy should define:

  • The current state as a narrative aided by high-level diagrams and quantitative and qualitative analysis. 
  • The future state with commentary about what we are trying to achieve, aided by high-level diagrams. 
  • transition plan to achieve the future state includes specific next steps or decisions.

Ensure the document walks through key business use cases and demonstrates how the components interact. It’s important to define the core systems and components of the architecture and their responsibilities. A great way to solidify an understanding of responsibilities is to focus on boundaries when walking through use cases by declaring for which each component is responsible (or not responsible). 

Execute the Plan

“Strategy without tactics is the slowest route to victory, tactics without strategy is the noise before defeat.” (Sun Tsu)

The execution phase of the technical strategy involves planning and prioritization, and delivery. At this point, the actions listed in the strategy are translated into a multi-quarter roadmap that maps to goals. 

The first steps are to size and sequence efforts. Where possible, use milestones to indicate some value delivered. Make sure the planning process is open and collaborative; roadmaps help a team navigate their role in delivering the outcomes described. Collaboration, by default, helps to ensure the team is aligned with the vision and strategy.

The delivery path can be long and arduous, sometimes successful, often oblique, and unfortunately riddled with FUD. Secure early wins to assuage fears and uncertainty. Focus on impact and return on investment when selecting which work to prioritize and identify possible partnerships with other teams that can help drive execution. 

Short-term, incremental milestones

Long-term visions outline a system(s) or project(s) that may take several years to complete. Over this period, we will learn new information that needs to be incorporated into the plan and help define the subsequent actions. Businesses shift quickly, and you need to be able to adapt to that change. This involves ensuring the delivery plan is incremental and collects rapid feedback. When coming up with short-term, incremental plans:

  • Don’t try to define every milestone through to the end delivery. The vision is directional and will likely evolve and shift as we learn more with each milestone. Instead,
  • Look for milestones achievable within a shorter window (e.g., 3-6 months, or shorter depending on the size and scope of the project). Each milestone should deliver value, such as a business or technical win. Know why it is a milestone. 
  • The long-term vision is a guidepost. Milestones should align with the end goal but allow room to veer slightly off-track if there is a good reason. Always be wary of scope creep.

Start with low-effort, high-value work to deliver quick wins, and build momentum and confidence. As a process is made, something built or learned in the previous milestone can sometimes make another milestone more achievable – compounding momentum.

Market the plan

Never present a strategy the team hasn’t heard before. Having the right people in the room at the conception stage is essential to get everyone on board. Think about who will provide core insights from both the business perspective and the technology side.

Craft the narrative to suit the audience. Highlight the reasoning behind the strategy and how it impacts them. You might need additional headcount or commitments from other parts of the organization, so you will need support from leadership or other teams. Be prepared to negotiate, and incorporate this back into the execution plan. 

Seek a sponsor to endorse and advocate for the vision and strategy. Ideally, this person is a leader who is in good standing, will go to bat when needed, and has a vested interest in the successful delivery. This type of endorsement can go a long way to substantiate the value of the work. 

Measure the Outcomes

“However beautiful the strategy, you should occasionally look at the results.” (Winston Churchill)

What does success look like for your team and its stakeholders? Were the principles adhered to? How do you know when the vision has become a reality and the mission is achieved? 

A technical vision and strategy outline goals to be achieved over a time boundary. These are expressed as objectives. The outcome translates into key results. OKRs and KPIs should be specific and outcome-focused, with clear and relevant markers to measure progress. 

Consider what data should be collected, why, and how. The action plan developed as part of the strategy should list the metrics to be tracked. When progress is small and incremental, data is critical in demonstrating whether the strategy is working or not. Metrics should be clearly tied back to the strategic objectives.

Be open to exploring options, and be intentional about tradeoffs. Use rapid prototyping and iteration to add incremental value and discover unknown unknowns at each stage. The goal is to gain enough data and insights to empower decision-making, (re)evaluate the following steps, and de-risk throughout the process. 

Useful Frameworks

This section provides a few frameworks you can adapt for writing vision and strategy documents.

Patil’s Project Principles

DJ Patil was the first US Chief Data Scientist and part of the Obama administration. During this time, he created a simple checklist emphasizing the need to iterate fast, plan big, experiment, and then engineer to scale, focus on the highest value, and cut waste. 

Patil’s checklist has much in common with Lean Thinking and the Pareto Principle and can act as a high-level guide for developing a vision and strategy. 

BAMCIS

BAMCIS is probably the most ubiquitous acronym in the US Marine Corps. It is a tool to assist leaders in making tactically sound decisions, formulating plans, communicating them, and turning those plans into action. The six steps are:

  • Begin the planning – determine what needs to get done and what information is required. During this time, you may develop questions about the vision or project for which you do not have the answer. This creates the plan for the plan. 
  • Arrange for reconnaissance – develop a list of research objectives and methods for gathering the information needed.
  • Make reconnaissance – execute the research and validate hypotheses. Compile the information gathered to finalize the plan. 
  • Complete the planning – revisit the initial plan, armed now with the answers to earlier questions. Build an operable plan to execute the vision.
  • Issues the order – effectively communicate the vision and align all contributors around the same objective.
  • Supervise – ensure that the right outcomes are achieved. 

There is a common saying in the Marine Corps that no plan survives first contact; BAMCIS is a highly adaptable framework that can aid decision-making and planning. 

Good Strategy / Bad Strategy

Good Strategy / Bad Strategy by Richard P. Rumelt takes a fuzzy concept and makes it clear. He explains what it takes to develop a strategy, the elements of a good strategy, and what makes some strategies bad. The book describes three aspects of a good strategy: 

  • Diagnosis – defines the challenge and describes what is holding you back from reaching your goals. 
  • Guiding policy – the approach chosen to overcome the obstacles identified in the diagnosis. 
  • Coherent action – describes how to carry out the policy.

Rumelt says that identifying and solving problems is the core of strategy. The book is worth the read, especially for architects (there is a lot of overlap between strategy and design work). 

Conclusion

Once the strategy is written, it should not go stale. Until the vision and strategy are actualized, the documents should be revisited about every six months and updated with any learnings or changes. An effective technical strategy provides the map that sets the course toward the north star vision. 

Giving a Kickass Product Demo

Technologists of all career paths should be able to ace giving a technical demo — not just folks in public facing roles. As an architect, product manager, or engineer you may need to give an internal product demo for a prototype or proof of concept. It takes a mix of science (methodology) and art (storytelling) to give a kickass demo. 

This post summarizes the methodology established by our team to ensure consistently successful demonstrations and a repeatable pattern that could be adopted by other public speakers. 

Introducing the “Tan France Method” 

Earlier this year, I led a session track, co wrote the product keynote, and presented a new product announcement at the inaugural Rubrik FORWARD conference. During this time, our team hunkered down to study what makes a technical demo successful. We determined that a presenter with great demo has a defined: 

  • Structure 🗺️ – story-based narrative with a clear progression, think a three-act structure
  • Focus 📍– addresses a specific use case or workflow and doesn’t meander
  • Audience 👥 – defined persona(s) that will be viewing this demonstration

When conducting a product or feature demonstration, I use a simple 3-step method that our team referred to as the Tan France Method™️. For those unfamiliar, Tan France is a stylist, fashion designer, and style icon that often uses a simple instructional method when styling someone.

Now, let’s apply this methodology to a technical product demo. It consists of the following steps:

  1. Set it up – consider using a slide that quickly summaries the demo, intended outcomes, and any applicable metrics and status. Keep it simple and use it to streamline the demo introduction. Explain exactly what the viewer is about to see: “In this demonstration, I will show you how to configure X. This consists of two steps, first A and then B.” Be sure to include any additional context that the viewer will need.
  1. Do the thing – “Imagine I am a [persona] attempting to [insert action or workflow]…” and complete the problem statement. Explain the value proposition of what you’re about to demonstrate and outline any key constructs. Demo the thing! Only show one action at a time. If you are showing multiple actions, make sure there’s connective tissue tying these actions together into a workflow. Let’s illustrate this idea by connecting provisioning and policy management actions:

😐 “while the instance is provisioning, let’s look at policies. A policy can be assigned to an instance to enforce a number of security and data retention requirements.”

🤩 “a benefit of this design is that you can apply policies during provisioning. This means that as soon as an instance starts, it has already inherited the assigned policies and is compliant to any security or data retention standards. While this instance is provisioning, let’s take a look at policies.”

Though it may be tempting to make an ad-hoc change during the demo, stick to the script and stay focused on the task at hand. It is important to have a logical flow to the story being told in the demonstration. 

Your demo will fail if it is too product focused — think about the story you’re telling. Why should your audience care? The demo should be driving towards a clear outcome that solves the problem you set up at the beginning. I recommend reading the chapter on giving demos in Guy Kawasaki’s “The Macintosh Way”. He asserts that a good demo is short, simple, sweet, swift, and substantial. Outline your demo using these qualities as the foundation. 

  1. Sum it up – Don’t overthink this, it can be as simple as: “In this demonstration, you saw X do 321, Y, and Z.” Make sure to highlight any key result or emphasize the desired outcome. Similarly to #1, I generally leverage a slide as a reminder to neatly wrap up the demo and move on. If code or config specs were shown during the demo, then I provide the code in a corresponding GitHub repository via a simple bit.ly link on the demo summary slide. 

It may seem rote to introduce and conclude a technical demo in such a formal manner, but keep in mind that the viewer is generally seeing this for the first time. Repetition is the mother of learning. This methodology ensures that the viewer begins and ends the demonstration hearing the value proposition.

Ace It

There have been demos in my career where I was flew by the seat of my pants but those days are gone. I strive to operate using the principle of 7 Ps: proper prior planning prevents piss poor performance. Simply put, your audience deserves better than you trying to figure it out in real-time. Here’s my process:

  1. Outline or mindmap the demo – be sure to highlight the “aha” moments. This helps me focus the narrative and ensure I’m telling a coherent and simple story. My demos are always use case driven and I like to reference specific customer examples throughout. Here’s an example of a mindmap created for a demonstration. 
  1. Build or prestage demo resources – use simple, straightforward resource names but be a little creative (e.g. use “John the DBA” and “Jane DevOps” instead of “user1” and “user2”). 
  2. Test and rehearse demo – time yourself, if lengthy determine what else can be pre-staged using a little smoke & mirrors. This also ensures your main points are crisp and aren’t rushed. Sometimes nerves can make presenters a little rambly when speaking so it’s important to rehearse and lock in timings. Consider recording a backup copy in case there are issues on game day. 
  3. Create intro/outro demo slide(s), as applicable – these are a reminder for me to make I begin and end with the intended outcome

Make sure to put thought to the aesthetics of your demo. Think of ways to make the demonstration more visually appealing: pleasing colors, bigger fonts, visible mouse. Thomas Maurer wrote a great post on this topic that you can find here.  

A word on live demos — keep track of time and always have a backup plan. Sometimes shit happens and things break. If something isn’t going to plan, do an initial assessment and make a judgement call. When on stage, I do a quick OODA loop and then decide whether to bail out or troubleshoot the issue. It may be compelling for some to troubleshoot live and bring the audience on that journey with you. However, this is not always the case and can often lose the audience thus reducing the effectiveness of your demo. Keep in mind the audience, their user personas, and familiarity with the topic. For these reasons, it’s always handy to have a recording that you can narrative over in the worst case scenario.

Summary

Giving a kickass demo should be a skill in every technologist’s repertoire. This post outlined a simple methodology that can be customized to fit the use case you plan to demo. Remember: proper prior planning prevents piss poor performance. 

Easy Collaboration with Terraform Cloud

Our team at Rubrik uses Terraform extensively to manage our infrastructure as code. This means that our infrastructure configurations are version controlled and resources are provisioned in an automated fashion through CI/CD workflows. Because it’s a customer-zero environment, we’re constantly evaluating new tools to find better ways to manage and scale the environment. This led us to trying out Terraform Cloud. 

Easy collaboration is the name of the game with Terraform Cloud. It offers team-oriented remote execution and is consumed as a SaaS platform. In this post, I’ll cover remote state management, cost estimation, and collaboration with Terraform Cloud.

Remote State Management

State files capture the existing state of provisioned infrastructure for a specific workspace. State files are stored on the local machine by default. This becomes unwieldy when the rest of the team is involved. 

Remote state management is a design consideration with which we’ve extensively experimented. My colleague, Chris Wahl, has written about using Amazon S3 to store state, which is how we have historically managed state. This resembles the following:

terraform {
  backend "s3" {
    bucket = "technicloud-bucket-tfstate"
    key    = "dev/terraform.tfstate"
    region = "us-east-1"
  }
}

Using Terraform Cloud to manage remote state resembles the following:

terraform {
  backend "remote" {
    hostname     = "app.terraform.io"
    organization = "technicloud"

    workspaces {
      name = "scaling-compute"
    }
  }
}

With Terraform Cloud, the state file is abstracted from the user; it exists but is secured and managed by the platform. This allows for granular access control, versioning, and backup so that I’m able review previous points in time. While Amazon S3 provides these same features, it requires quite a bit more effort to do so. For example, remote state management with Terraform Cloud provides integrated locking, eliminating the need to spin up a DynamoDB table.

Terraform Cloud enables teams to easily collaborate asynchronously by using the platform as remote state file storage.

Cost Estimation

A very cool feature that stood out was the cost estimation, which displayed an approximate monthly cost with each workflow run. This is particularly beneficial to me because we use Terraform to deploy resources across all three major cloud service providers. Holistic billing management across multiple clouds has long plagued me:

https://platform.twitter.com/widgets.js

This standard interface provides a valuable way for our team to analyze, report on, and visualize cloud spend across cloud providers.

While this alone does not give a complete picture of our monthly bill, it certainly helps us be mindful of cost when testing and building demos. We are regularly building demos to showcase our product’s cloud functionality; this process consists of design time spent architecting a solution and then usually a lot of prototyping to get the demo perfect. The prototyping phase consists of deploying and destroying resources numerous times, which can quickly rack up a big bill when not paying attention to cost.

However, the Terraform Cloud Cost Estimation API provides a lot of granular data that can be pulled into our central billing dashboard. This helps us be mindful of monthly costs to operate our cloud environment. Using this data, we made the decision to use demo leases of 4 hours to help minimize costs for demo; after 4 hours, the resources are stopped. This helps us keep central IT off our backs 🙂

Team Collaboration

Terraform Cloud offers a number of collaboration features to help teams easily work together. Our team prioritizes making our code as reusable as possible; we regularly write modules that fit our design specifications and use cases. The Private Module Registry allows us to easily share the different use case modules that we’ve built. 

There’s also multi-tenancy with the ability to create and manage multiple teams and organizations and enforcing Role Based Access Control (RBAC) across the different workspaces. Moreover, you can manage Terraform Cloud configurations using Terraform.

Here’s an example of using the Terraform Cloud provider to create an organization, workspace, team, and permissions:

# Create the Terraform Cloud Organization
resource "tfe_organization" "technicloud" {
 name  = "technicloud"
 email = "rebecca@technicloud.com"
}
 
# Create the Technicloud Workspace
resource "tfe_workspace" "technicloud-wordpress" {
 name         = "technicloud-wordpress"
 organization = tfe_organization.technicloud.id
}
 
# Add Web Dev Team
resource "tfe_team" "web-dev" {
 name = "technicloud-web-dev"
 organization = tfe_organization.technicloud.id
}
 
# Add User to Web Dev Team
resource "tfe_team_member" "user1" {
 team_id  = tfe_team.web-dev.id
 username = "rfitzhugh"
}
 
resource "tfe_team_access" "test" {
 access       = "plan"
 team_id      = tfe_team.web-dev.id
 workspace_id = tfe_workspace.technicloud-wordpress.id
}

So basically…

You can find the above code sample on GitHub.

Summary

In this post I reviewed a handful of compelling Terraform Cloud features. This includes remote state management, cost estimation, and collaboration features. Consider using Terraform Cloud for state storage and collaboration (especially the Private Module Registry), it’s free for small teams (up to 5)! Since we do not yet use Sentinel, I did not get a chance to test out Sentinel policies with Terraform Cloud but hope to implement it soon. 

If you have any questions, please reach out to me on Twitter.

Hello, Terraform

At work, my team owns and maintains a large lab environment for the development and testing of Rubrik Build projects. It was built in a hurry, causing some of our original design principles to be compromised. My team and I have decided to use this no-travel period as an opportunity to redesign and redeploy our lab environment. I will review our design in a later post. 

One of our design goals is to leverage infrastructure as code principles (where possible). The team’s primary tool of choice for provisioning is Terraform

Terraform allows us to define what resources we need in a declarative manner, where we simply define the end state needed for our infrastructure. Here’s a few reasons why we like using Terraform:

  • Multi-platform, similar operations across a number of providers
  • Easy provisioning and deprovisioning of resources
  • Idempotent, saves current state as a file
  • Detects diffs from current state when applying changes

This post will dive into Terraform syntax, architecture, and operations.

Terraform Syntax

The low-level syntax of Terraform is defined in HashiCorp Configuration Language (HCL). The following example shows a generic configuration code block for Terraform:

command_type "provider_resource_label" "resource_label" {
  argument_name = "argument_value"
  argument_name = "argument_value"
}

Let’s dig into the syntax:

  • Command — the command type resource tells Terraform you want to create a resource, such as an S3 bucket or an EC2 instance.
  • Provider Resource Label — this is the type of resource you want to create. The resource name is specified by the provider. For example, you may use aws_instance to provision an EC2 instance using the AWS provider.
  • Resource Label — this what you want to colloquially label the resource within your Terraform configuration. This label should be unique within this configuration file as it is used later when referencing the resource.
  • Arguments — allows you to specify configuration details for the resource being provisioned. These are defined as an argument name and an argument value. As an example, when provisioning an EC2 instance, you may want to specify which AMI is used. 

Note that comments using # or // or even /* or */ are supported. 

To put these concepts together, an example configuration code block may resemble:

resource "aws_instance" "my-first-instance" {
  ami = "ami-008c6427c8facbe08"
  instance_type = "t2.micro"
  availability_zone = "us-west-2c"
  
  tags = {
    Name = "my-first-instance"
    Environment = "test"
  }
}

This example will provision a single EC2 instance in the US-West-2C availability zone, using the AMI specified, along with assigning the two tags. 

Most of your Terraform configuration is written in these code blocks. Once you master this, then you’ll be able to quickly write and provision more resources.

Terraform Architecture

A typical Terraform module may have the following structure:

project-terraform-files
│
└─── terraform-module-example01
│   │   main.tf
│   │   variables.tf
│   │   terraform.tfvars
│   │   outputs.tf
│   
└─── terraform-module-example02
│   │   provider.tf
│   │   data-sources.tf
│   │   main.tf
│   │   variables.tf
│   │   terraform.tfvars
│   │   outputs.tf

The names of the files are not important. Terraform will load all configuration files within the directory.

Providers

A provider is the core construct that allows Terraform to interact with the APIs across various platforms (PaaS, IaaS, SaaS). Think of this as the translator between the platform API and the HCL syntax. Before you can begin provisioning resources, you must first defined which platform by specifying the provider:

provider "aws" {
  region = "us-west-2"
}

Place the provider block in your main.tf file or create a separate provider.tf file.

Resources

I previously covered how to structure resource code blocks in the Terraform Syntax section. 

This example defines the creation of an instance based off the defined AMI, sized as t2.micro, and properly tagged:

resource "aws_instance" "my-first-instance" {
  ami = "ami-008c6427c8facbe08"
  instance_type = "t2.micro"
  availability_zone = "us-west-2c"
  
  tags = {
    Name = "my-first-instance"
    Environment = "test"
  }
}

Define the desired outcome for your resources in the main.tf file.

Data Sources

Data sources enable you to reference resources that already exist outside of Terraform or defined by a separate Terraform configuration. This allows you to extract information that can then be fed into a new resource. First, defined the data source and then reference this as an argument value:

data "aws_ami" "ubuntu" {
  most_recent = true
  owners = ["aws-marketplace"]

  filter {
    name   = "name"
    values = ["ubuntu/images/hvm-ssd/ubuntu-trusty-14.04-amd64-server-*"]
  }

  filter {
    name   = "virtualization-type"
    values = ["hvm"]
  }
}

resource "aws_instance" "my-first-instance" {
  ami = "${data.aws_ami.ubuntu.id}"
  instance_type = "t2.micro"
  availability_zone = "us-west-2c"
  
  tags = {
    Name = "my-first-instance"
    Environment = "test"
  }
}

In this example, I am again creating a new EC2 instance. However, this time I am gathering AMI information using a data source to find and use the latest Ubuntu version instead of manually defining that AMI value. This allows my configuration to be more flexible because I no longer need to manually find and input the appropriate AMI value.

A data source is declared similarly to resources, except that the information provided is used by Terraform to discover existing resources rather than provision. Once defined, data sources can be referenced repeatedly to pass information to new resources. 

Place the data source blocks in your main.tf file or create a separate data-sources.tf file. 

Variables

To make your code more modular, you can choose to use variables instead of hard-coding values. Once defined, variables can be referenced:

provider "aws" {
  access_key = var.aws_access_key
  secret_key = var.aws_secret_key
  region = var.aws_region
}

I typically declare my essential variables in a separate variables.tf file. This may resemble:

variable "aws_access_key" {
  description = "AWS access key for authorization"
  type = "string"
}

variable "aws_secret_key" {
  description = "AWS secret key for authorization"
  type = "string"
}

variable "aws_region" {
  description = "AWS region in which resources will be provisioned"
  type = "string"
  default = "us-west-2"
}

In this example, I have declared a value for the AWS region to be reused when provisioning the infrastructure defined. The descriptions are optional, and for the developer’s benefit only, but I always recommend being kind to the next person using your code. The possible variable types are string (default type), list, and map. Variables can also be declared but left blank, setting their values through environment variables or a .tfvars file. 

Sometimes the variable definition may be specified as a default in the variables.tf file. Otherwise, this value should be defined by creating a file named terraform.tfvars, which allows variable values to persist across multiple executions. This is especially valuable for sensitive information such as secret keys. 

For example, the contents of the terraform.tfvars file may resemble the following variable definition:

aws_access_key = "ABC0101010101CBA"
aws_secret_key = "abc87654321zyxw"
aws_region = "us-west-2"

Terraform automatically loads all files in the current directory with the exact name of terraform.tfvars or any variation of *.auto.tfvars. If the file is named something else, you can use the -var-file flag to specify a file name.

However, keep in mind that these persistent variable definitions often contain sensitive information, such as passwords or API token, and should be treated with care. Consider adding this to your .gitignore file.

Outputs

Outputs can be used to display information needed or export information after Terraform completes a terraform apply command. An example output may resemble:

output "instance_id" {
  value = "${aws_instance.my-first-instance.id}"
  }

You can save the outputs files in a specific file called outputs.tf.

State

When you use Terraform to build resources, a state file gets created and contains configuration information for the resources provisioned. This is what allows Terraform to determine which parts of the configuration have changed, ultimately what provides idempotency because Terraform is able to determine the resource is present and does not create it again. 

After the terraform apply command is executed, the affiliated directory will contain two new files:

  • terraform.tfstate
  • terraform.tfstate.backup

Note: any manually changes made to Terraform provisioned infrastructure will be overwritten by terraform apply.

Modules

Terraform configuration files can be packaged as modules and used as building blocks to create new infrastructure resources without having to put forth much effort. Modules are available publicly in the Terraform registry, and can be directly added to configuration files for quickly provisioning resources.

If I were to use a pre-packaged module to provision an AWS S3 bucket, the code may resemble:

module "s3_bucket" { 
  source = "terraform-aws-modules/s3-bucket/aws" 
  bucket = "my-s3-bucket" 
  acl = "private" 
  versioning = { 
    enabled = true 
  } 
}

In this case, you are reusing the configurations specified by the module. All you need to input are the configuration values.

Terraform Operations

Terraform is managed through a simple CLI. Terraform is a single command-line application: terraform and you specify the action through a subcommand such as apply or plan

To view a list of the available commands at any time, just run terraform with no arguments.

In order to get started, you will need to run terraform init to initialize a number settings for Terraform that will create the required environment to proceed. It will also download the necessary plugins for the selected provider.

Before provisioning, you may want to generate an execution plan, or otherwise known as a dry-run of your changes. Generate by running terraform plan. Terraform outputs a delta, showing you which resources will be destroyed (marked with a -), which will be added (marked with a +), and which will be updated in-place (marked with a ~).

Once you have reviewed the execution plan and are ready to begin provisioning, run terraform apply to the changes to be executed. If at any point you need to remove the resources, simply use the command terraform destroy. If there are multiple resources in the module, you can specifically name which resource(s) to destroy. For example: 

terraform destroy - target=aws_instance.my-first-instance

In general, once you have defined the infrastructure in the .tf files, working with Terraform is pretty much just running terraform plan and terraform apply repeatedly (unless you use CI).

Summary

In this post, I described Terraform syntax, architecture, and common operations. Throughout the article I used the example of creating an AWS EC2 instance, however, these principles apply to all resources types across providers. I hope this helps you get started in your infrastructure as code journey. 

Happy Terraforming!

Visualizing the Conceptual Model for Technical Architecture

I have previously written about putting together the conceptual model with logical and physical design; however, I want to dig a little deeper into the conceptual model. The conceptual model categorizes the assessment findings into requirements, constraints, assumptions, and risks:

  • Business requirements are provided by key stakeholders and the goal of every solution is to achieve each of these requirements.
  • Constraints are conditions that provide boundaries to the design.
    • These often get confused with requirements, but remember that a requirement should allow the architect to evaluate multiple options and make a design decision whereas a constraint dictates the answers and removes the ability for the architect to decide.
  • Assumptions list the conditions that are believed to be true, but are not confirmed:
    • By the time of deployment, all assumptions should be validated.
  • Risks are factors that might have a negatively affect the design.
    • All risks should be mitigated, if possible.

giphy-2.gif

Requirements

Describes what should be achieved in the project; describes what the solution will look like.

  • Example: The organization should comply with Sarbanes-Oxley regulations.
  • Example: The underlying infrastructure for any service defined as strategic should support a minimum of four 9s of uptime (99.99%).

The part that tends to trip people up is functional versus non-functional requirements.

Functional Requirements

A requirement specifies a function that a system or component should perform. These may include:

  • Business Rules
  • Authentication
  • Audit Tracking
  • Certification Requirements
  • Reporting Requirements
  • Historical Data
  • Legal or Regulatory Requirements

Non-Functional Requirements

A non-functional requirement is a statement of how a system should behave. These may include:

  • Performance – Response Time, Throughput, Utilization, Static Volumetric
  • Scalability
  • Capacity
  • Availability
  • Recoverability
  • Security
  • Manageability
  • Interoperability

Often times, non-functional requirements will be laid out as constraints — the part makes this concept murkier. In the context of a VCDX design, these should typically be defined as a constraint, whereas requirements are more typically functional requirements. Be careful how you word a non-functional requirement: if it’s stated as a must and there is no room for the architect to make a decision, then it’s a constraint. But if it is a should statement is gives more than one choice for a design decision then leave it as a requirement.

Constraints

Anything that limits the design choice made by the architect. If multiple options are not available to make a design decision, then it’s a constraint.

  • Example: Due to a pre-existing vendor relationship, host hardware has already been selected.

If this is a bit difficult to grasp, don’t worry, you are in good company. This is a question that appears often.

Untitled.png

In this example, because the business dictates that HP ProLiant blade servers must be used, then it is a constraint. This leaves no room for me, as the architect, to make a design decision — it has been already made for me.

Assumptions

Assumptions are design components that are assumed to be valid without proof. Documented assumptions should be validated during the design process. This means by the time the design is implemented, there should be no assumptions.

  • Example: The datacenter uses shared (core) networking hardware across production and nonproduction infrastructures.
  • Example: The organization has sufficient network bandwidth between sites to facilitate replication.
  • Example: Security policies dictate server hardware separation between DMZ servers and internal servers.

These examples are a bit of low-hanging fruit. Don’t be afraid to dig a little bit deeper. If there’s anything documented or stated without empirical proof, then it is an assumption and needs to be validated.

Risks

A risk is anything that may prevent achieving the project goals. All risks should be mitigated with clear SOPs.

  • Example: The organization’s main datacenter contains only a single core router, which is a single point of failure.
  • Example: The proposed infrastructure leverages NFS storage, with which the storage administrators have no experience.

No design is perfect and it is important to document as many risks as you can identify. This will give you the opportunity to be prepared and craft mitigation plans. Not paying close attention here may leave the design in a vulnerable state.

Additional Examples

Can you specify which conceptual model category is correct for each example?

Category

Description

Requirement The design should provide a centralized management console to manage both data centers.
Assumption The customer provides sufficient storage capacity for building the environment.
Constraint The storage infrastructure must use existing EMC storage arrays for this project.
Requirement The platform should be able to function with project growth of 20% per year.
Assumption Active Directory is available in both sites.
Requirement Solution should leverage and integrate with existing directory services.
Risk Both server racks are subject to the same environmental hazards.
Assumption BC/DR plans will be updated to include new hardware and workloads.
Requirement The SLA is 99% uptime.
Constraint External access must be through the standard corporate VPN client.
Risk Having vMotion traffic and VM data traffic on the same physical network can lead to security vulnerability because vMotion is clear text by default.

Resources

To learn more about the enterprise architecture or the VCDX program, please join me, Brett Guarino, Paul McSharry, and Chris McCain at VMworld on Wednesday, 29 August 2018 from 11:00-11:45 to discuss “Preparing for Your VCDX Defense”.

Problem Solving with the Cynefin Framework

Effective leaders know that problem solving is not “one-size-fits-all”. The action taken depends on the situation and, because the circumstances are changing, better decisions can be by using an adaptive approach. I have previously written about the 75% method that I learned in the military, but there’s another framework that I have consistently used with success.

Cynefin, pronounced “kih-neh-vihn” (don’t worry, I mispronounced it for longer than I’d like to admit), is a Welsh word that means “place”. The Cynefin framework was coined in 1999 by Dave Snowden. Simply, the Cynefin framework is used to help realize that not all situations are equal and to successfully navigate different situations, different responses are required.

Picture1

The 5 Domains

Problems are categorized into five domains using the Cynefin framework (yes, five, don’t forget disorder!).

Ordered Systems

The domains on the right (obvious and complicated) are “ordered” because cause-and-effect are known or can be discovered.

Obvious (fka “Simple”)

This is the domain of best practice.

In this context, the problems are apparent cause-and-effect relationships that are well understood.

The methodology is to “sense – categorize – respond” to obvious problems. This means that the situation should be assessed, categorized by type, and then respond based on an existing process or procedure. These tend to be repeating patterns and/or consistent events…or “known knowns”.

For example, these are problems faced at a helpdesk or call center – often predictable and there are established processes in place to handle the vast majority.

Be careful – some obvious contexts may be oversimplified. This happens when leaders (or organizations, for that matter) experience success and become complacent as a result. Ensure that there are feedback loops in place so that any situations that don’t exactly fit with an established category can be reported.

Another risk with complacency is that leaders may not be receptive to new ideas. Endeavor to stay willing to pursue a new or innovative suggestion.

Complicated

This is the domain of good practice. Sometimes referred to as the “domain of experts.”

Complicated problems may have multiple correct solutions. There is a relationship between cause and effect, but it may not be obvious to everyone because the problem is…well…complicated. There may be several symptoms but you are not sure how to fix them.

The methodology here is to “sense – analyze – respond”. Effectively you should assess the situation, analyze what is known (using the help of experts), and decide what the best response is using good practices. This is generally where we experience “known unknowns” where we know the questions that need to be answered, but may not know the actual answer. It is at this point that we consult the expert. With enough time, you could reasonably identify the known risk and develop a plan. Think evolutionary, not revolutionary.

The danger here is that a leader may lean too heavily on experts while ignoring good solutions from others. In tech, we tend to experience this where we rely on the experts and ignore the generalists – even though the generalist may have the winning answer. Additionally, the leader may experience analysis paralysis. This is where I recommend using the 75% method detailed here.

Unordered Systems

The domains on the left (complex and chaotic) are “unordered” because cause and effect can be deduced only with hindsight or potentially not at all.

Complex

This is the domain of emergent practice.

Sometimes it is impossible to identify a single correct solution or to spot the cause-and-effect relationship. You are likely in a complex context.

This context is typically unpredictable, making the best approach “probe – sense – respond”. Think “unknown unknowns”. You may not know the correct questions to be asking. Regardless of how much time is spent in analysis, it may not possible to accurately identify the risks, predict the solution, or the effort needed to solve the problem.

In this situation, it is best to patiently wait, look for patterns, develop, and experiment to gain more knowledge. As more knowledge is gained, then determine the next steps. Repeat as needed. The goal is to move into the “complicated” domain.

A potential risk is that leaders may fall back into habitual command-and-control modes which are futile in this context. Leaders lacking patience may try to force facts instead of waiting for patterns. It is imperative to have a feedback loop so that open discussion can occur to develop experiments for observing patterns. Think “what if we tried…” Use creativity to solve the problem.

Complicated and complex situations are similar in some ways, and are sometimes confused. If a decision based on incomplete data is being made, you are likely to be in a complex situation.

Chaotic

This is the domain of novel practice.

There is no relationship between cause-and-effect. This means that the primary goal here is to establish order and stability. This is likely a crisis or emergency situation.

The methodology is to “act – sense – respond”. It is necessary to be decisive in order to address the burning issues, determine where there is and isn’t stability, and then work to move the situation from chaos to complexity. Basically, shit has hit the fan – triage time: stop the bleeding and start the breathing… then determine what the real solution should be.

It may feel like in tech we live in this domain (hopefully not!). As an example, there may be an issue in production, say a bad patch that has been installed data center wide. Initially the focus will be on containing the issue and correcting it quickly. The initial solution may not be great, but it gets the job done. Once the bleeding has stopped then you can determine the better long-term solution.

In this situation, the leader must provide clear and direct communication while taking immediate action to re-establish order. A risk is an indecisive leader. This is the time to find “good enough” instead of the perfect answer.

Disorder

Disorder is the space in the middle.

There is no clarity here – decompose and move to another context. Basically, if you have no idea where you are, then you’re likely in “disorder”. The immediate goal is gather information in order to move to a known domain.

In this situation, I tend to try to break the massive disorder into smaller problems and then tackle each one individually. Apply each problem to a domain and work on a solution.

Chaotic problems are dangers, especially when left unaddressed, because there is no process to fix it. This is why it is important to move into a known category.

Final Thoughts

The Cynefin Framework is an excellent model to assist in approaching different situations. Once the situation is defined, then work to solve the problem.

The goal is to adequately lead your team through any of these five domains. Many leaders can only lead effectively in one or two domains (not in all of them) and few, if any, prepare their organizations for diverse contexts. The only way to successfully get through all five domains is to keep an open mind to new and creative solutions, build a feedback loop, and not get stuck in analysis paralysis.

Cynefin_framework_by_Edwin_Stoop

Additional Resources:

Cognitive Edge: The Cynefin Framework (explained by Snowden himself!)

Everyday Kanban: Understanding the Cynefin framework – a basic intro

Sherrieg: The Cynefin Framework

Harvard Business Review: A Leader’s Framework for Decision Making

Ch-ch-change Management

Change management has never been easy for the dev or the ops side of the house. Let’s face it; it’s usually a checklist item and a tool to CYA. However, we are moving to a world where change is a part of the culture and a frequent process. There is no excuse to not improve.

The ultimate goal of change management is to drive organizational results and outcomes by engaging the staff to encourage the adoption of a new way to work. Whether it is a process, system, job role, or organizational structure change (potentially…all of the above), a project can only successful if the individual changes daily behaviors and begins doing the job in a new way. This is the nature of change management.

Therefore, staffing a change management board with a crew of change-adverse individuals will get you nowhere.

Change Management

Often we look at change management as a way to spot problems after they happen. Thus it becomes a tool for responding to change, instead of leveraging change. In this world of DevOps that embraces change as a mechanism to iteratively improve on processes, change management is usually viewed as a blocker to avoid. But in most enterprises and verticals, it cannot be avoided.

Often we look at change management as a way to spot problems afterthey happen. Thus it becomes a tool for responding to change, instead of leveraging change.

In this world of DevOps that embraces change as a mechanism to iteratively improve on processes, change management is usually viewed as a blocker to avoid. But in most enterprises and verticals, it cannot be avoided.

Tooling and implementation can be detached from governance. This decoupling can result in lost communication and a reactive philosophy. Instead consider funneling all changes through the same channel so that nothing gets lost and the change advisory board (CAB) considers all changes. Begin by consolidating change, problem, and incident management into a modular platform that is a part of your DevOps tooling that can streamline everything into one pipeline.

feedback loop

This may seem outlandish at first, but by integrating change into pipelines automates the capture of change records with a set of artifacts. The goal is to ultimately improve collaboration and to build an auditable history.

Companies often establish different modes of change to balance speed, quality, and risk. Consider automating the approval gate for some modes of change. This speeds change processing and increases adoption. This shares the responsibility of effectively making change happen back on to those individuals who conduct the implementations.

Change management should be a priority and used as a single source of truth of all changes. Doing so will increase visibility for risk and compliance management.

We can distill this down to three key ideas to assist in implement efficient change management:

  • Do not decide a new direction and then dump it on your team. Involve them in the decision-making process.
  • Make work visible to all.
  • Embrace value stream mapping to find new ways to increase efficiency.

The bottom line is to be proactive about how change is managed.

Considering the Methods for Release Engineering

The entire goal of release engineering is to accelerate rollout of new software or new releases as much as possible. Release engineering focuses on building a pipeline that transforms source code into an integrated, compiled, packaged, tested, and signed product that is ready for release.

Release management coordinates release workflows between various dev and ops personnel. Release engineers are more technically focused: working with the code, build systems, configuration management tools and container platforms, among other pipeline components, directly.

The goal is for the process to be as simple as possible. Complexity is the enemy of most things. Is my architecture good if it is so complex that no one can figure out how to implement and manage it? Same principles apply to DevOps frameworks. The architecture of the product that flows through the pipeline is a key factor that determines the structure of the continuous delivery pipeline.

For our processes to be simple, we need to automate as much as possible, including any approval gates that aren’t critical. There should be clear expectations of the release workflow and proper feedback loops. Not communicating results back will kill any process. It is imperative for the dev personnel to be communicating with ops to coordinate the release.

DevOpsElephant

And then of course…a method of releasing the new version.

Canary

The concept of canarying first emerged in the early 1900s when coal miners would take the caged bird into the mines. Canaries are more susceptible to carbon monoxide than humans; therefore it would quickly die signaling to the miners to get out.

Canary release is a release engineering technique used to reduce the risk of introducing a new software version in production. It accomplishes this by slowly rolling out the change to a small subset of users before rolling it out to the entire infrastructure and making it available to everybody.

Once the release environment and new version are ready, redirect a few selected users to it. Maybe 5-10%. But, how do you choose which users will see the new version? There are a few different options:

  • Try out the release on internal users first
  • Randomize the user selection
  • Use specific characteristic-based criteria to determine the user subset

The idea is that the faster you can get feedback, the faster the deployment can fail or proceed.

canary-release-5c74ac79
Image from: https://www.gocd.org/

As your comfort level increases with the new version, begin and wider release across the infrastructure and re-directing more and more users to it. Canary releases let you dip your toes in before pulling the trigger on a full release.

Google Cloud Platform blog has a cool post about release canaries, and so does Instagram.

Blue-Green Deployment

The concept with a blue-green deployment is fairly simple – there are two identical infrastructures: “green” with the current production load, say v1; “blue” is deployed with the newest version of the app.

blue-green-deployments-d73adc69
Image from: https://www.gocd.org/

Smoke tests or other kinds of tests have been run, and the “blue” environment is ready to go. Once ready, just change the router / load-balancer / reverse proxy to that “blue” environment. In any automated release, the cutover itself is the most challenging part. This must be done quickly in order to minimize downtime as much as possible. Blue-green deployments approach this by ensuring the two production environments are as identical as possible, minus the application version.

This option also provides a quick to way rollback. If something goes wrong, just switch the router / load-balancer / reverse proxy back to the “green” environment. The goal is to regularly cycle from “blue” to “green” and then “green” back to “blue”. Or, from live to staging for the next release.

Feature Toggles

Feature Toggles (also referred to as Feature Flags) are a powerful technique that allows you to modify system behavior without changing code. The general idea is that you have a configuration file that defines a few toggles for a handful of pending features. The application will use the toggles to determine whether or not to how the new feature.

1*Bn9hPemOuERvqfq0jo2CoQ
Image from: https://medium.com/@thicaso/1-minute-feature-toggle-e0b52a554ffd

Most of these decisions occur in the user interface of the application. There may be a set of toggles that surround any UI part of a pending feature. It will pass the new feature through if the toggle is enabled, if not, it will simply skip it.

Toggles introduce complexity. This complexity can be somewhat controlled by maintaining a clear process while using appropriate tools to manage the toggle configuration. It should be a goal to restrict the number of toggles in the system to the absolute minimum required.

This option seems to be a better fit for organizations with more mature CI/CD processes. Etsy and Flickr provide a great examples of using method this to manage deployments.

Digging into Test Automation

Part of making processes more efficient is relying on the crucial component, automation. In DevOps, automation is a near-must for successful performance, because it reduces the number of repetitive tasks thus decreasing the time required for quality results. It is the biggest quality maintainer and speed promoter.

As it’s impossible to automate everything, it’s important to have an automation strategy to get maximum ROI from time and money spent. A properly planned strategy can increase the speed of development and free up teams to concentrate on more essential tasks.

Select the correct cases to automate

What cases do you choose for automation?

Repetitive tests, high-risk cases, large data sets or checks for different browsers and environments

Well…it depends…on the service you are developing and on your team’s capabilities. The goal is to automate the cases providing the most benefits for the development process and across the entire organization.

Implement automation throughout a sprint

Short release cycles releases can be achieved only if the development and examination are finished simultaneously at the end of the sprint. That’s why quality assurance should begin as early as possible. For example, consider unit testing with each build.

Continue to apply automated cases

It is important to build flexible tests because it is inevitable to cases to evolve over time. It may be ideal to write small cases rather than creating cases with dozens of steps at initial implementation. Consider separating test into smaller steps and individually check components rather than an entire app stack.

Types of Tests

Unit testing is the practice of testing small pieces of code, typically individual functions in an isolated manner. If the test uses some external resource, such as a database, it’s not a unit test.

Functional testing is the testing of complete functionality of an application.

As the name suggests, integration testing is testing how parts of the system work together – the integration of the parts. For example, a unit test for database access code would not talk to a real database, but an integration test would.

Unit and integration tests’ results are validated in code, whereas functional test results should be validated the same way as a user would validate it.

Whenever code is modified, even a small tweak can have unexpected consequences. Regression testing ensures that a change or addition hasn’t broken any existing functionality. The goal is to catch bugs and to ensure bugs that were eradicated stay that way. As an example, re-running a test scenario that was originally created when a problem was initially fixed can help to validate new changes don’t cause components to fail.

Test Framework

After deciding what types of tests to run, the next step is determining success criteria and then automating the tests. A test framework establishes a set of rules for designing and creating the test cases. Typically, a framework combines practices and tools to increase efficiency.
Consider making the test environment closely resemble customer environments, as well as to accommodate for differences. When testing, ensure to test all options for a particular variable. For instance, when conducting web-based GUI tests, make sure to test all major browsers. Don’t only test with Firefox and call it a day. Don’t forget to test scalability and security.

What is the point of running tests if there are no results? Don’t forget to account with how the metrics are reported.
I am fond of the test pyramid approach popularized by Mike Cohn. The pyramid says that tests on the lower levels are cheaper to write and maintain, and quicker to run. Tests on the upper levels are more expensive to write and maintain, and slower to run. Therefore you should have lots of unit tests, some service tests, and very few UI tests.
pyramid
Most testing can and should take place during dev by running unit tests after every build. It is easy, cheap, and fast to conduct these tests and it allows for checking work as you go.
After all unit tests pass, move into the component, integration, and API testing phases. These tests validate most logical and business processes without going through the UI. Therefore, it’s recommended to automate these as much as possible.
UI tests run last and least; because these tests are costlier and more difficult, it is ideal to run as few as possible. Consider automating critical tests to remove the human element. From there, complete any manual tests. During this phase, it is critical to design based on user workflow. Start with user login and move forward from there.

If you are still interested in test automation, feel free to check out this corporate blog post I authored.